“Optimize CNC Program” – it’s the instruction you hear in your head when you’ve finished a machining program. And it can be an arduous process that, if you’re like me, you slave over. Typically a bit too much, wasting a lot of time on changes that don’t add up to a substantial improvement. As we all know, time is money, so, I’ll try to relieve you of some of the labor of revamping your program. Here’s a list of quick, easy, and effective tweaks for your DATRON programs.
Optimize CNC Program Tip 1 – Leave the coolant on
It may not sound like much, but this gain can really add up. If you’re using coolant in your program, consider switching it from the Positioning/Cutting feed setting from Cutting <0>, to Travers<1>. You may not easily perceive it, but there is a very brief dwell programmed into the software so that the coolant has time to begin spraying. This change in the command will leave your coolant spraying between positioning movements, thus avoiding the initial dwell. Now, each dwell may only last 1/10th of a second, but if you have 200 retracts in your program, you just shaved 20 seconds of your program, and that’s not nothing.

Optimize CNC Program Tip 2 – Ramp
If you’re cutting along a contour, consider changing your method. If you are currently doing depth cuts, try a ramp instead. A ramp keeps the tool engaged in your desired amount of material throughout (except for the very beginning and the very end), and has no retracts. Let’s say again that your part has 200 retracts cutting contours on 20 different features (10 retracts per feature). By ramping, you’d bring that number down from 200 to 20 (final retract), and if each retract takes half a second, you just saved 90 seconds.
Optimize CNC Program Tip 3 – Be smooth
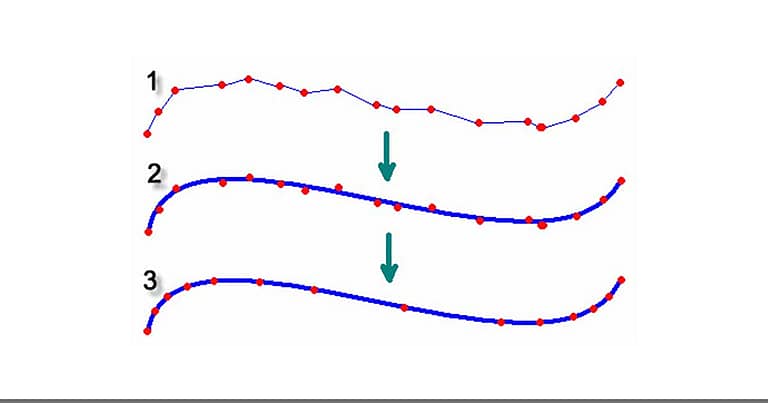
If the devil is in the details, then small contours are your devil. If you’re doing intricate engraving or 3D contouring, then you’ve probably noticed that the machine will slow down to follow all contours tightly. It’s just following orders, but if you have a little leniency in your adhesion to contours, Smoothing can make a huge difference.

Smoothing will take jagged geometry, like what is pictured above (purple), and apply arcs to the contour to create a smooth, more continuous motion (red). Not only does this have benefits for surface finish, but since the machine doesn’t need to slow down nearly as much in an arc as compared to a vector, time savings can be abundant. And utilizing it is as easy as writing the code in your macro, editing the preset values (which work well for most things), and pressing the “Go” button.
Optimize CNC Program Tip 4 – Be dynamic
I’ve talked about dynamics at length before and all the benefits from using them to fine tune a process for speed optimization and ideal surface finish, so why am I mentioning them again? Easy, besides the fact the dynamics settings are one of the easiest ways to reel in cycle time, adjusting them in conjunction with smoothing yields even better results. A high dynamics setting combined with a smoothing filter means that a very minimal amount of deceleration is needed to turn a corner quickly, thus cutting your cycle time even further.
Optimize CNC Program Tip 5 – Get low
This is usually a gimme, but it takes about 10 seconds of your time to change your retract heights from 0.5”, to 0.050” (or lower). Minimizing your retract height won’t save you much time per retract, but think of the big picture. Even if you only saved 5 seconds per part, if you’re making 20,000 parts per year, you just saved over a day of machine time. Every second counts.
Optimize CNC Program Tip 6 – Keep your tools in order
It seems obvious, but try to keep your operations organized so that when a particular tool is done, it never gets used again in the program. Sometimes this is unavoidable, but each tool change will cost you somewhere around 15 seconds of time. Consider using combination tools to cut down on tool changes. Most importantly, if you have parts nested, use tools sequentially rather than by part. If you have to cut 24 parts, and each part uses 4 tools, you’ll either spend 24 minutes changing tools again and again, or 1 minute changing all the tools once.